I entered the design world with numerous ideas for novel apps and websites- such as a parking ticket dispute app, tutorials for washing dogs, and visual “Shazam” scans of coffee beans, to name a few. Interestingly, all of these began with a few visual concepts of screens, and that’s where they stopped. It appears that without a solid foundation, now recognized as information architecture and user flows, my ideas remain abstract and unproductive.
However, if you have a strong foundation, all you need for the next step – low-fidelity prototyping- is paper, pencils, and a vivid imagination. Let’s delve into this crucial phase of the design thinking process, exploring what it is, its benefits, and its application in app development.
What is low-fidelity prototyping all about?
Low-fidelity prototypes are simplified, early-stage representations of a product or interface that emphasize functionality rather than visual design. At this stage of the design thinking process, wireframes and prototypes work together and are essential for developing user-aligned products. Wireframes serve as quick, rough outlines of a product, aiming to define the layout and the most critical components. In contrast, prototypes simulate a final product and are used throughout the design process for usability testing. Low-fidelity prototypes utilize wireframes to test user flows and information architecture.
Low-fidelity prototypes are usually made with pencils and paper or basic digital tools.
Some benefits of paper prototyping include:
- Rapid iteration – it’s easier to discard a paper design that took five minutes to create than a digital mockup that you spent over an hour perfecting.
- Low cost – you only need paper, glue, scissors, and some sticky notes or index cards.
- Enhanced creativity -it offers all participants a level of freedom that only pencil and paper can provide.
- Efficient documentation – Designers can take notes and outline ideas for reference throughout the project.
- Efficient feedback – Paper prototypes encourage honest feedback because people comment more freely than when they have to criticize a more polished prototype.

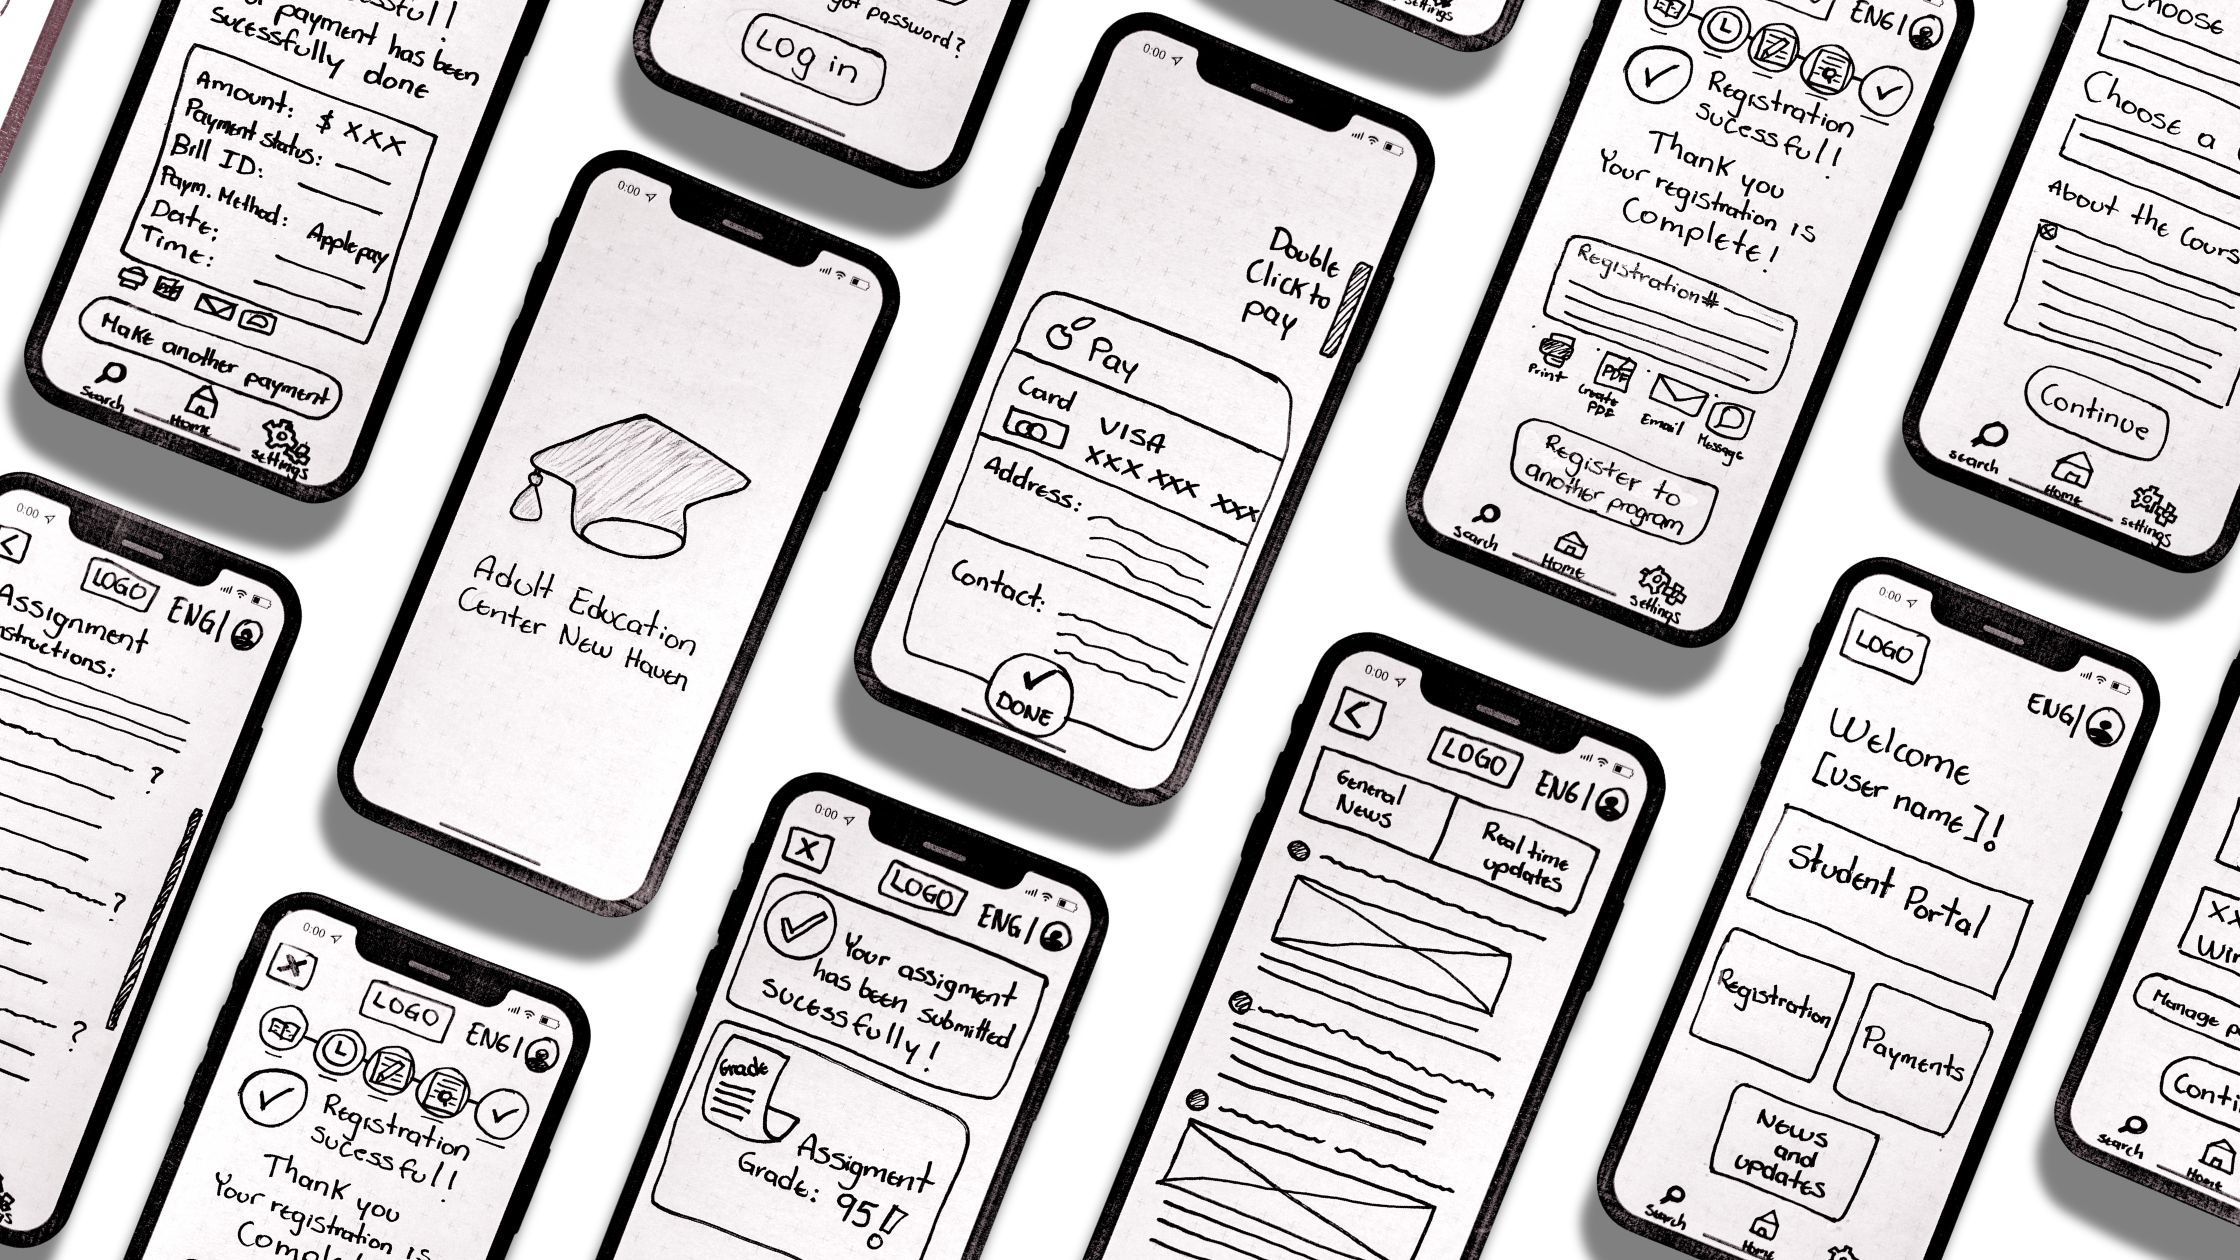
Paper prototyping of The Adult Education Center New Haven app
How did I start my paper prototypes?
Ben Coleman’s article “How to Make Prototypes” outlines his method for designing paper prototypes. I embraced his strategy, considering an outward-in perspective and emphasizing progressively smaller components: devices, screens, elements, and interactivity.
Device:
For my paper prototypes, I developed my designs using a mobile app, as it is the most accessible device for all school users. I focused my sketches on the iOS operating system, creating a mockup for an iPhone 12.
Screens:
In my previous blog, I created four user flows and their corresponding user scenarios. This allowed me to visualize the user journey through the digital solution, helping users achieve their goals. Those include:
- Registration process for a course
- Payment due balance in the app
- Student Portal Usage – Submission of homework
- Check for any real-time alerts or news updates

Elements:
The Adult Education Center New Haven app was developed as a highly task-oriented tool. Users can find all task options immediately after launching the app. The home screen displays the four main features of the app as clickable buttons: Student Portal, Registration, Payments, and News and Updates. Through each feature, users will navigate an easy path, selecting options based on their preferences and filling out a form if necessary.
I integrated a “Progression Task Indicator” into this app. As a former school student, I can attest that many users lack technical and academic backgrounds and are not fluent in English. Ensuring their security and providing a positive experience throughout their app journey is a high priority. This task indicator in the registration and payment processes simply visualizes their current position in a series of steps and how many tasks remain. In addition, I added a simple translation feature at the top of every screen.

Interactivity:
The app is highly interactive, guiding the user with sequential instructions throughout the entire journey. Users can select from a dropdown menu and confirm their choices with a call-to-action button at the bottom, ensuring their decisions are correct.
Some school-related tasks can be tedious and lengthy. To avoid using multiple screens for these tasks, I created some shortcuts. For example, when a student wants to locate a specific assignment, they can do so on one screen using hierarchical drop-down horizontal menus: course, module, and then assignments.

Another key feature is the ability to complete simple school assignments and receive feedback on the phone. As a former student in the school, I used to practice English grammar on paper handouts. Incorporating those into the app would improve student accessibility and provide a more positive experience.
In this example , the teacher provides a questionnaire with multiple-choice options. When users finish answering all the questions and submit their homework, the app will assign a grade based on the correct answers provided by the teacher.

The impact of paper prototyping on the preceding design steps:
As expected, my low-fidelity prototyping process involved some modifications to the previous design steps, including information architecture and user flows. For instance, access to app settings was moved from the main navigation to the bottom navigation tab bar, as this task seemed less important and was not part of my designed user flows. Knowing the audience, I aim to keep the screen simple and uncluttered. I also added more features to the payment section, including options for viewing statements and initiating payment plans, based on helpful critiques from my classmates.
Conclusion:
Low-fidelity prototyping proved to be an essential part of the design process. It allowed me to explore choices related to navigation, elements, and interactivity throughout the user journey. This step is distinct in its interaction with the preceding design steps and its fundamental use of traditional tools. It appears that there is much you can achieve with a simple pencil and paper.
Enclosed is the complete presentation of my paper prototypes.